Engine

Anti-Splat Air/Oil Seperator

4 hours, 24 May 2014

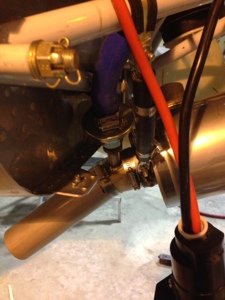
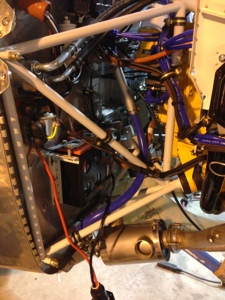
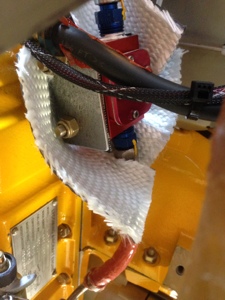
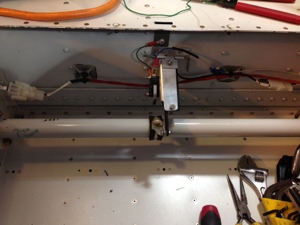
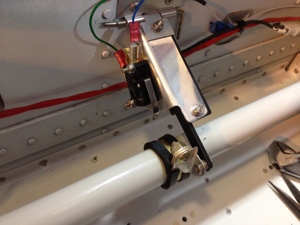
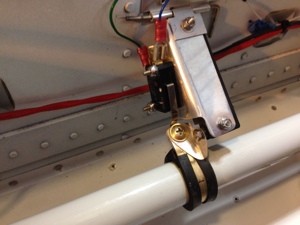
I installed the Anti-Splat Air/Oil Separator and exhaust valve. I changed the mounting structure that held the right side exhaust muffler and pipe to accommodate the Oil Separator drain tube and valve. I also changed the routing of the oil and air drain tube routing and added a section of the aluminum pipe to the blue hose as to route the house out away from the firewall and then back again to the valve that connects to the exhaust pipe.

20140602-133744.jpg

20140602-133753.jpg

Section 45, Cabin Doors and Transparencies

Door Interior Painting

Paint used on the interior Doors

20140602-132653.jpg

20140602-132705.jpg

20140602-132723.jpg

20140602-132734.jpg

G3X Components Section 37, Fuel System

Fuel Tank Sender Calibration

May 25, 2014. 8 hours

Today I went to Pearland Regional to get 40 gals of fuel to calibrate the fuel tanks. The G3X system makes this process very easy and straight forward. I decided to poor in 1 gal at a time which gave me great resolution. Although 1 gal at a time is a long drawn out process, I want good measurements.
I filled the left tank first and reached the tab at 22 gal. The sender unit stopped registering at 25 gals but the tank easily fit 30 gal. Stumped the tank, no contamination yet. I then disconnected the line from the mechanical fuel pump and turned on then electrical fuel boost pump and flowed several gal of fuel through it.

Flow Rate (left/right):
1 gal at 1 minute 16 seconds.

I did the same process to the right side with the same results.

I then pulled the purge valve control to the ICO position with the throttle at 1/2 and mixture fuel rich. Dave Forster my neighbor stopped by and lent some help with verifying fuel purge valve lines where flowing fuel. We then verified what the flow rate was I with the main fuel line from the mechanical fuel pump to the servo. This gave me a flow rate of 1 gal at 1 minute 14 seconds. We then pushed the tail all the way down to the ground, almost a 14 degree pitch ( I think I remembered that pitch correctly.). Again we pumped 1 minute 18 seconds, the pump inlet never un ported with only 2 gallon the tank.

20140525-225748.jpg

20140525-225758.jpg

Fuselage

Interior Painting

May 24, 2014. 8 hours

Spent the day repainting the interior overhead console since I inadvertently used the wrong paint the night before. Oh what joy that process was. After lots of sanding I was able to complete my task and applied new paint to the over head console and the cabin top adjacent areas.

I also worked on making the lower cover panel for the right door. Lots of fiberglass work and covering of the hinge access locations.

20140525-223838.jpg

Section 45, Cabin Doors and Transparencies

Door Work and Interior Overhead Work

May 22, 2014, 3 hours

I removed the right door to start working on the small cover panel for over the door mechanical mechanism. This will help hide the ugly holes in the door. I laid up two layers of fiberglass on the door. Will trim it out today hopefully and start smoothing out the interior door surface for paint.

I kept working with the overhead fiberglass with smoothing it out filling the pin holes and trying to make it look decent. Lots of dust and hard work. I should have done this prior to putting on the cabin top but I really didnt know what I wanted to do at that time.

Section 35, Fuselage Interior Panels Section 45, Cabin Doors and Transparencies

Interior and Door work

May 18, 2014. 8 hours

The horrible fiberglass work continues…. I have been working on the left door trying to finish it before I install the window. I had smoothed out the inside door the best I could with UV Smooth Prime and then a Dupli-Color primer filler (FP101 Grey Filler). This actually worked well as I didn’t expect it to. I then followed it with Dupli-Color Acrylic Enamel Gloss White (DA1670) and then a Dupli-Color Acrylic Enamel (Crystal Clear Coat DA1692).

Prior to all the painting I closed out the hinge attach points. We plan to cover the lower panel that covers the access into the door mechanism with some material yet to be picked out.

20140523-134142.jpg

Armrest and Center Console Throttle Quad

Throttle/Mixture Cable, Center Console, Rudder Trim

May 10th, 2014 16 hours

Throttle cable and Mixture cable arrived after I reorder longer cables for both.
CT Q-67, P/N: 184VTT2-67. it specifically says not for use on aircraft.. go figure..
CT Q-60. The 60″ went to the Throttle and the 67 went to the Mixture.

The Throttle cable required the rod end be connected lower on the servo arm. It also required the Throttle control quadrant to be re drilled lower as well. A very slight amount, maybe 0.25″ is not used on the bottom side of the Throttle quad. The entire range of motion is achieved on the throttle servo.

The mixture cable did not require anything special, just connected it up on both ends.

After the throttle quad was connected I finally was able to install the Aerosport throttle quad cover and tunnel covers. Installed the fuel selector valve red knob. Fastened the center arm rest in place also.

20140523-134234.jpg

Show Planes Cowl

Cowling side pin work

May 09, 2014, 8 hours

Today I concentrated on the side hinge attachment for the upper and lower cowling. Also cut out the area where the Aerosport “RV10” emblem goes to cover the pin access location. Over all the process went well but had a slight over sanding of one area where “daylight” is seen through the cowl hinge slots. I will correct this issue later on. Riveted the hinge half’s to the cowl half’s and shortened the hinge pins. The cowling should be at a stage where it can be attached to the airframe but I have not done so since I am still working on the engine.20140523-123907.jpg20140523-123921.jpg20140523-123933.jpg

20140523-124013.jpg

Engine Fuel Lines

Wrapped the Red Cube

May 2, 2014. 4 hours

Performed misc work this day. Wrapped the red cube with fire sleeve. I used stainless steel clamps to hold the black fire sleeve. Secured several more hoses in the engine compartment since I had received in another shipment of Adel clamps.20140507-133843.jpg20140507-133926.jpg20140507-133935.jpg20140507-133942.jpg

Flight Line Air Conditioning Fuselage

Close out panels and AOA switch

April 30, 2014 3 hours

I decided it would be best to start closing up the panels in the back of the airplane along with securing the wires being routed in these areas. I also installed the AOA switch to the flap sensor so when the flaps transition out of the -3 degree setting the AOA is alerted to the configuration change.

I also installed the transition from the evaporator tot he AeroSport overhead. I drilled a couple of holes and added some rubber door seals. I also installed the close out over head panels to the overhead. It looks good but sadly I scratched the overhead when I was working with the AeroSport Headliner inserts.

20140507-133429.jpg

20140507-133451.jpg

20140507-133509.jpg

20140507-133521.jpg