0.5 hours, 25 June 2014
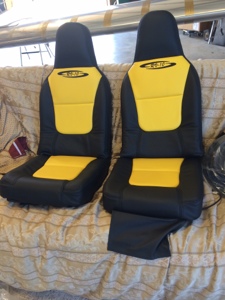
The Aerosport seats arrived !! They look great and we cant wait to install them after the inspection of the airplane is completed. I will need to add velcro to the bottom of the seats.
0.5 hours, 25 June 2014
The Aerosport seats arrived !! They look great and we cant wait to install them after the inspection of the airplane is completed. I will need to add velcro to the bottom of the seats.
0.50 hours, 17 June 2014
I added the IGN1/2, ECU 1 and ECU 2 labels along with the defrost and panel lights labels to the switches in their respective locations.
5 hours, 8 June 2104
On Friday 6th we received the headliner from Aerosport. My wife was excited to start working on putting the headliner on the fiberglass headliner parts. She laid down a blanket and all her supply’s and watched Geoff’s install videos a couple of times then went to work on it. It turned out very nice but I goofed up and didn’t take into account the thickness of the material and so it cover our LED strip lighting we have on the top of where the headliner meets the overhead ducting. I will order some of the rubber trim that we put around the windows and use that to finish off the trimmed area that I will need to remove to the LED lights can still be seen. A real bummer since my wife did a great job on the covering. Pictures to come..
2 hours, 6 June 2014,
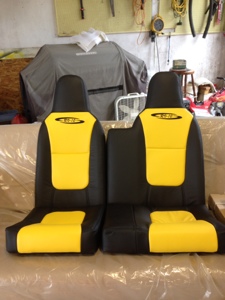
Front two seats arrived from Aerosports. Zac did a great job coordinating the seat color and layout with us. We very much like the two front seats and are excited about the rear seats to arrive after they receive new hide.

May 10th, 2014 16 hours
Throttle cable and Mixture cable arrived after I reorder longer cables for both.
CT Q-67, P/N: 184VTT2-67. it specifically says not for use on aircraft.. go figure..
CT Q-60. The 60″ went to the Throttle and the 67 went to the Mixture.
The Throttle cable required the rod end be connected lower on the servo arm. It also required the Throttle control quadrant to be re drilled lower as well. A very slight amount, maybe 0.25″ is not used on the bottom side of the Throttle quad. The entire range of motion is achieved on the throttle servo.
The mixture cable did not require anything special, just connected it up on both ends.
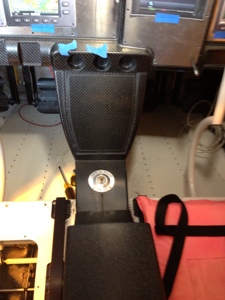
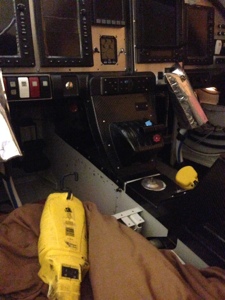
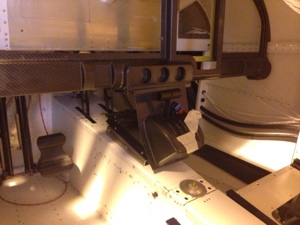
After the throttle quad was connected I finally was able to install the Aerosport throttle quad cover and tunnel covers. Installed the fuel selector valve red knob. Fastened the center arm rest in place also.
8 hours, Oct 19, 2013
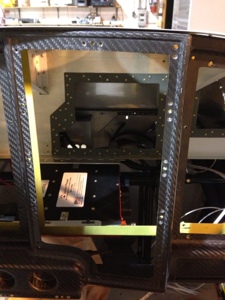
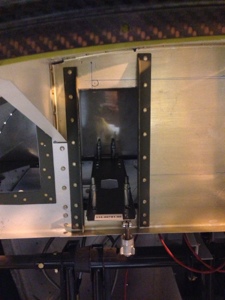
While I was letting epoxy dry on the cabin top I decided to start working on installing some of the basic avionic units in the sub panel area of the front panel. The GTS-800 weighs about 9 lbs and I was very concerned with the weight and balance issue and where I could mount the “brick” with good structural integrity. The GTS-800 comes with a tray mount to make the unit as a Line Replaceable Unit -LRU. I decided to used the bottom tray since it would hold the unit nicely and allow for a somewhat easy way for me to mount everything. Although the tray added more weight this was the best option since I had to span a distance from one of the cross members in the panel to the firewall. The picture explains what occurred to get tit mounted. I had thought about mounting it back on the empty spot on the air conditioner tray but the weight and balance numbers weren’t very favorable for this.
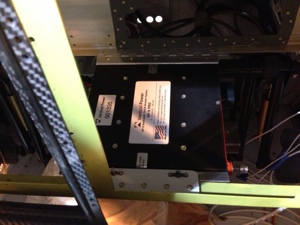
I moved on to mounting the VPX Pro. I thought I could mount the box near the right side of the sub panel but I quickly realized this wouldn’t work because of the wires coming off the unit plus there was minimal room with push pull cables in that area also for controlling heat vents. I decided to locate it very near the center of the sub panel just behind where the veneer controls would go and this is also the location where I am placing the GMA-305 autopilot control panel. I hinged the VPX box to the middle support structure and hard mounted a tab that the VPX will attach to near the front panel. This should allow for access to the avionics equipment mounted higher in the panel.
Oct 3-4th, 2013. Hours 5
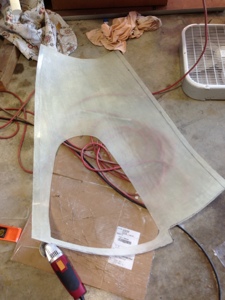
I spent some time trimming the Aerosport RV10 Headliner fiberglass backing. Not knowing exactly how things were to fit I slowly trimmed the edges off the headliner. I over cut the right side headliner and had to epoxy bak on a piece to make up for the gap I left up by the overhead. I was able to get it all fixed up but I still need to work on getting it parallel to the side face of the overhead.
I am waiting to pick the fabric color until after the seats are upholstered so I will report on that process later on.
8/25/2013, 2 hours
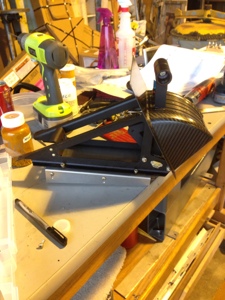
I worked on mounting the throttle quad to the attach bracket provided in the kit from Aerosport. I requested the throttle quad mount that is attached lower than the standard mounting kit since I wanted the angle and height of the throttle controls to be lower. I like the feel of it better than of the standard mounting method plus this allows for better access to the fuel selector valve. I was able to get all the mounting attach brackets drilled and nut plates attached. Now I need to attach it to the center tunnel panel. I am waiting on the new carbon fiber quad insert piece since they need to make a special one since to make this work with the standard panel the piece needs to be cut slightly longer. It should arrive this Thursday.

Aug 5-7, 2013 – 6 hours.
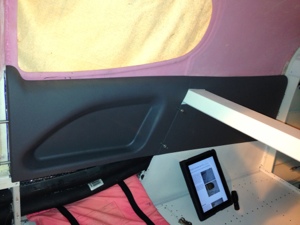
Started to work on the Aerosport front seat, rear seat and baggage area side panels. The instructions call for installing the rear seat side panels then the baggage area panels then finally the front seat panels. I choose the front seat panels, not sure why but I did and this seemed to work out ok but they are much harder to install than the others. The front panel consisted of dealing with much more trimming and fitting then the others. Once the panel on the front left was fitted I moved to the right side where I had to contend with the Air Conditioning hoses as they ran to the firewall. This caused me to put a cutout to allow for the bulge caused by the hoses.
The rear seat and baggage panels are fairly straight forward once you figure out the alignment line you want to establish on the top side of the panels. The mounting holes are drilled on all panels accept for the front seat panels. I still need to attach the nut plates and drill the attach holes into the front seat panels. I will be making a clip to help hold the right side front panel near the Air Conditioning hoses. The clip will help apply pressure to the panel over a larger area that just a screw might.
I mounted the control arms to the back seat outside air vent controls. I also cut the air vent holes in the rear seat side panel and matched up the transitions air duct pieces between the side wall skin and the panels.
Saturday Aug 3, 2013 12 hours.
I worked with the armrest and center console that will eventually hold the throttle quad. This took a little time since I really wanted to get the fitment right. The gas selector is in a non standard location compared to Vans so I had to deal with that condition plus I have different rudder pedals. The Control Approach pedals require the mounting of the side panel of the center console to be trimmed to fit around the tubes. Plus since I have the pedals as far aft as possible since I am short I think that might have added to some of the reason why the trimming need to occur. After assembling the center console on the bench I was able to locate the holes for mounting it to the tunnel. This went fairly well along with attaching it to the dash panel.
I did not mount the actual throttle quad since I am unsure of what sytle I want to use. Geoff has two kinds and I am waiting on them to send me the second kind so I can fit them and see what I like best.