Avionics

Avionics at Steins Facility

September 5, 2013
I was sent a brief update by Danny Jones who is providing the wiring harness as dangling wires for our avionics configuration. It is exciting to see this coming together and am even more excited to start installing it. Danny has a couple more items to work but will be ready to ship sometime in September.

20130910-141140.jpg

20130910-141150.jpg

Avionics EDS-4ip Mountain High Aviation Oxygen System

Center Console Mountain High Oxygen System air connections

Aug 31, 2013. 6 hours
The 4 oxygen control pulse units from Mountain High Oxygen will be mounted in the center console since this provided the most logical location for the units versus work required for other locations. The hose routing went from behind the rear baggage bulkhead to the flap control tube then over to the center tunnel. I temporarily placed the tubing and several cable tie mounting brackets since I will later come back and run the communication wire for the units. I also ran black tubing inside the tunnel to accommodate the wire run up to the dash where the control head will be mounted. This tube will also house all the headset jacks along with music audio input jack for the rear seats.

20130910-135322.jpg

20130910-135335.jpg

Interior - Aerosport Throttle Quad

Aerosport throttle quad mounting

8/25/2013, 2 hours
I worked on mounting the throttle quad to the attach bracket provided in the kit from Aerosport. I requested the throttle quad mount that is attached lower than the standard mounting kit since I wanted the angle and height of the throttle controls to be lower. I like the feel of it better than of the standard mounting method plus this allows for better access to the fuel selector valve. I was able to get all the mounting attach brackets drilled and nut plates attached. Now I need to attach it to the center tunnel panel. I am waiting on the new carbon fiber quad insert piece since they need to make a special one since to make this work with the standard panel the piece needs to be cut slightly longer. It should arrive this Thursday.

20130826-145931.jpg

20130826-145939.jpg

20130826-145944.jpg

20130826-145952.jpg

Engine Firewall Forward

Engine oil cooler mod

8/25/2013, 1 hour.
I started looking at mounting the engine oil cooler. It is the Airflow Systems 2007-x model. It is slightly larger than stock model and the mounting tabs need to be trimmed for it to fit onto the oil cooler box. The oil cooler box needs to be trimmer as well and have the upper attach tabs removed and placed higher up onto an angle bracket to capture the top mounting holes of the oil cooler. I started working on modifying the oil cooler.

20130826-145101.jpg

20130826-145110.jpg

Engine Prop

Spinner (D-7709P) and prop gov arm (C-4582-P)

Today I received the prop spinner (D-7709P) and prop governor arm (C-4582-P) from our local prop shop, R&D propeller located in Pearland, TX The spinner is special order since it is for the Show Planes cowling and it requires a ~15″ diameter spinner. While it wasn’t cheap it sure looks very nice in its polished state and in its 15″ size. I almost was set back when I noticed how large the spinner actual was. I hope it doesn’t look to big in front of the RV10.

20130822-202620.jpg

20130822-202634.jpg

20130822-202642.jpg

20130822-202649.jpg

Avionics Panel Design

Panel Design Rev A

Aug 21, 2013 – 1 hour
I spent some time cutting out paper and piecing it back together again trying to come of with my panel layout. I took various other panel solutions and molded them into my way I thought the panel should be. Dont laugh but it worked fairy well.

I needed to give Stein some idea of what i was trying to do with my panel since they will be providing harness for the avionics but it will be “flying – ends” that I will terminate once in the aircraft.

20130822-202001.jpg

Section 12, Empennage Fairings

Elevator Trim Plates -redo

Aug 20, 2013 – 2 hours.

I had originally machined some of the elevator trim nuts (WD-415) that attach to the E-616 trim plates but I machined the wrong angle in them. I was then forced to purchase new plates and nits so I purchased some from IFlyRV10 machined nuts and went about matching them to the E-616 plates. I dimpled the plate and machined countersunk the machined WD-415s. Then attached four nut plates to the back side of the nuts. I attached everything to the cables and elevator trim tabs and all matched very well.

20130822-201257.jpg

20130822-201308.jpg

20130822-201317.jpg

Avionics EDS-4ip Mountain High Aviation Oxygen System

EDS-DP Type E3

Aug 18, 2013 – 8 hours.

I started working on mounting the EDS-DP air distribution controllers, all 4 of them. I decided to mount the units in the Aerosport center arm rest console. The mounting was fairly straight forward except I needed to pay attention to clearances because of the mounting angled surfaces I was working with. Over all it turned out ok but I was slightly large on mounting hole cut out but a larger surface o-ring will help cover the very small gap that appears between the control module and console. I apparently only tool one picture but will later update the page with more of the locations where they are mounted.

20130822-200356.jpg

Avionics EDS-4ip Mountain High Aviation Oxygen System

EDS-4ip MH Oxygen System

Aug 14th, 2013 – 2 hours.
I was able to complete the mounting bracket plate the oxygen tank will be mounted onto and got it riveted in. Working in those small areas just aren’t fun when your “special” angle drill keeps slipping gears and wont turn the drill bit. Frustrating!! Another frustrating event that occurred was I routed the 1/8″ copper tube for the refill line for the tank and I didn’t realize that the end connector had two small wedge pieces that are supposed to be installed. I installed the copper tubing with only the large wedge piece around the copper tubing and then realized after I had “squished” the fitting that this wasn’t they way it was supposed to work! Im ordering more parts from Mountain High now so I will order some of these fittings also. Something told me it wasn’t right and I certainly need this line to hold since it will have 2000 to 3000 PSI on it. I have also included a picture of the refill station located under the baggage floor.

20130815-124552.jpg

20130815-124559.jpg

20130815-124906.jpg

EDS-4ip Mountain High Aviation Oxygen System

EDS-4ip MH Oxygen System

Aug 11-12th, 2013 – 4 hours
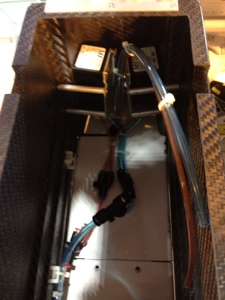
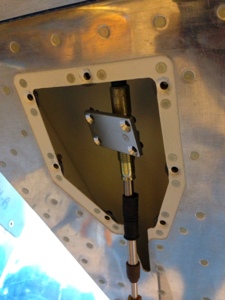
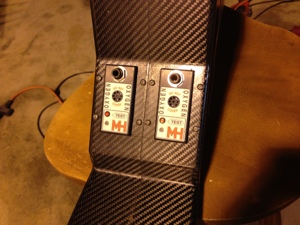
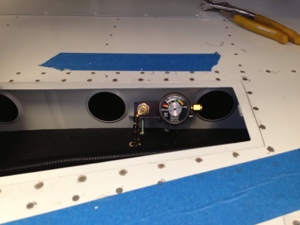
I started working with the Mountain High EDS-4ip Aviation Oxygen System. First I unpacked the box to figure out what I was working with. I decided on mounting the the Deluxe fill station with gauge and the (current) 3/8-24 (MS22066) fitting under the baggage area. It is located under the access door in the baggage area. I do not have picture of this install at this time but will in the future since it is not plumbed yet. The unit hides nicely out of the way and is very easy to access when it will need to be recharged.

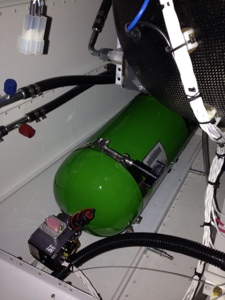
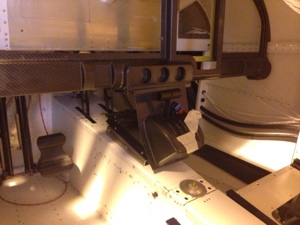
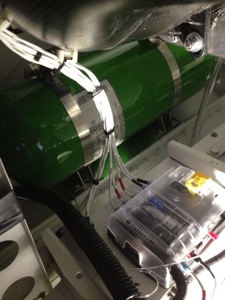
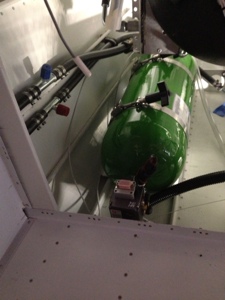
i am mounting the Oxygen tank on the starboard side of the aircraft since I cannot fit it on the port side located adjacent to the rear standard battery location. On the port side is also the strobe light system not allowing enough room for access. I will be mounting the oxygen bottle horizontal and not vertical as I original wished since the air conditioning tray interferes with the height of the oxygen bottle. I have not completely installed the mounts yet but have drilled the mounting holes only at this point.

20130813-092226.jpg